Table of Contents
I.Product Description
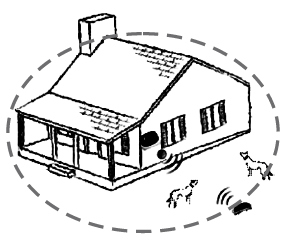
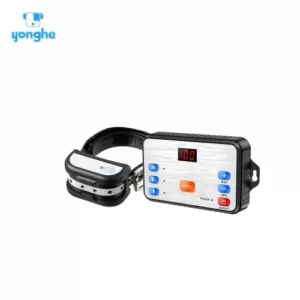
KD661/KD661 C is reliable and safe for pet training. It completely got rid of the trouble of wiring, and very convenient to establish a safe area of pet activities. Transmitter as the center, the remote control radius is up to 500 meters, and coverage is up to 78 hectares. In this large space, your dog can go everywhere freely and safely.You wouldn’t worry about their activities limited or getting lost. Therefore, it can be widely used dog training at home or field trip.
II. Main Features
- Completely wireless fence system.
- A circular signal area based on central of transmitter and the remote control range is up to 500 meters.
- Start up with warning tone and static shock modes automatically if your dog is beyond remote control range.
- Rechargeable transmitter with high battery inside.(ONLY AVAILABLE for KD-661C).
- 100 levels of transmitter signal intensity to adjust the remote control range.
- Very easy to make pairing for transmitter and receiver.
- Multi collar receivers are supported by one transmitter.
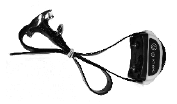
- Waterproof and rechargeable receiver collar.
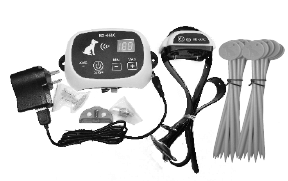
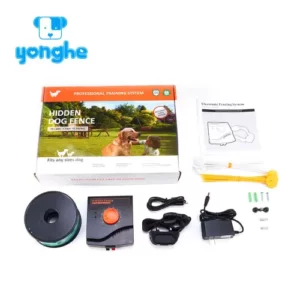
III. Package Including
KD661-1 / KD661C-1:
- Wireless Transmitter “1
- Collar Receiver *1
- Adjustable TPU Strap “1
- 5V/1A Charger “1
- Metal Contact Probes *4
- LED Test Light *1
- English Manual *1
- Flag *20
(FLAG ONLY AVAILABLE for KD-661C-1)
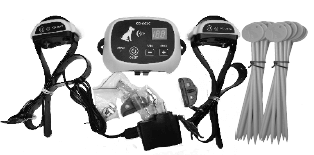
D661-2 / KD661C-2:
- Wireless Transmitter “1
- Collar Receiver *2
- Adjustable TPU Strap “2
- 5V/1A Charger “1
- Metal Contact Probes *8
- LED Test Light *1
- English Manual *1
- Flag *20
(FLAG ONLY AVAILABLE for KD-661C-2)
IV. Transmitter operation
1.Power ON or OFF the transmitter
Press ON/OFF button and hold for 3 seconds to power on the transmitter. The LED power indicator will light up to be blue and a value of signal level displays on the screen.

To power off the transmitter, you can also press ON/OFF button and hold for 3 seconds.
2.Set up the remote control range
The remote control range is a straight distance between transmitter and receiver collar, which depends on the intensity of transmitted signal. The value of transmitted signal is more, the remote control range isfarther. For this wireless fence KD661/KD661C, the max. remote control range is up to 500 meters.
Press “+” or “2 button on the transmitter, you can increase or decrease the signal level from 0 to 100 levels. the value you setting will display on the screen.
Below table shows you the correspondence between transmitter signal level and remote control range.
| Transmitter Signal Level | Remote Control Range |
| 10 | 25M |
| 20 | 50M |
| 30 | 65M |
| 40 | 80M |
| 50 | 95M |
| 60 | 115M |
| 70 | 140M |
| 80 | 170M |
| 90 | 230M |
| 100 | 500M |
Notice:
The remote control distance is measured in pen area, it will be affected by electromagnetic waves or obstacle around the fence system, and the distance will be reduced slightly.
3.Switch the transmitter in pairing status
When the transmitter is on, press ON/OFF button and shortly switch it in pairing status. The screen will display “1dP” with flashing.You should finish the pairing within 10 seconds, otherwise, the display will disappear and return back to working status (it will display signal value ) .
4.Charge for the transmitter (ONLY AVAILABLE for KD-661C)
The KD661C transmitter is rechargeable. When the LED power indicator changes to be red and flashing , it means transmitter is low battery. Please charge for it. Once it is fully charged, the LED will turn to be blue.
Notice: Please charge it at least 4 hours at first time.
V. Receiver collar operation
1.Assemble the parts into receiver collar
Assemble 2 contact probes to receiver’s screws. (There two type probes in the package, the short ones suit for small size dogs, and long probes for medium and large size dogs. ), and then make TPU strap go through receiver back and both holes.
2.Power ON/OFF the receiver
Press “ON/OFF” button and hold for 3 seconds to turn on the receiver collar. A short “Bi” sound will be heard and red LED lights on. If the transmitter is off or out of control, the “Bi” sound will issue every seconds, unit you turn off the receiver or make sure the transmitter is on and within remote control range, which displays on the transmitter screen now.
3.Make receiver pairing with transmitter
To make a receiver pairing with transmitter, firstly you should ensure the transmitter is in pairing status and receiver is on, and then press ON/OFF button shortly. Once the power LED of receiver is changed to blue with a short sound “Bi”, it means the pairing is successful.
Notice: If the transmitter is off, the receiver would not enter into paring status.
4.Charge for the receiver collar
The receiver collar is rechargeable. When the LED power indicator red and flashing, it means the receiver is low battery. Please charge for it. The charger is common with that of transmitter. Once it is fully charged, theLED will change to blue.
Notice: Please charge it at least 4 hours at first time.
VI.Connect a receiver to transmitter
If you want to connect any of KD661/KD661C receiver with a KD661 /KD661C transmitter and set up the fence system. You should make them pairing at first. Please follow the pairing steps as below.
Step 1: switch the transmitter in pairing status
Check the transmitter is on. And then press the ON/OFF button shortly. The screen will display “1dP” with flashing, it means the transmitter is in pairing status now.
Step 2: make a receiver pairing with the transmitter
Take a receiver near the pairing transmitter, press the ON/OFF button of receiver shortly. The power LED is changed to blue and a short sound “Bi” is issued, it means the pairing is successful.
Notice: you should finish the pairing within 10 seconds, otherwise, the display of transmitter will disappear and return back to working status (it will display signal value ) .
Step 3: verify the wireless fence system
Setting a proper signal levels on transmitter panel to get the remote control range you want (please refer to step 2 of IV, “set up remote control range) .
Take away the receiver from the transmitter until “Bi-Bi” sounds is issued from it, and attach the LED test light on contact probes of receiver, the LED will light on. That means, the receiver is beyond the boundary you set just now and all the function are OK.
Otherwise, the receiver is not connect to the transmitter, you should connect it again as above steps.
Notice: all the receivers have been paired to the transmitter and verified the connection before packing.
VII.Start training your dogs
- Put the receiver collar on the neck of your dog, and check the tightness is proper.
- Check or Set the transmitting signal level by pressing “+/- ” button on the transmitter. The value you setting will display on the screen. Notice: The remote control range is measured in open area, it will be affected by electromagnetic waves or obstacle around the fence system, and the distance will be reduced slightly.
- Place the transmitter is more than 1.5 meters from ground, and there is no any metal wall around it. So as to obtain the best remote control range.
VIII.Working principle of the fence system
The system will start up automatically while your dog is running beyond the setting control range and going ahead, the receiver will startup working as this sequence, until your dog comes back to “safe area”.
- Issue “Bi-Bi” warning sounds with red LED is flashing every 2 seconds.
- Start static shock in low level after the third warning sound and increase the intensity of static shock from level 1 to level 4 every seconds.
- Stop working for 30 Seconds and then start another sequence.
If your dog doesn’t come back to the safe area always, the receiver will give up working after the third cycle. It will automatically shut down to prevent your dog from excessive punishment.
Notice: Please check the transmitter is sufficient battery capacity, while the system is in working status. If the transmitter is powered off somehow, the receiver will keep working with warning sounds and static shock for 3 work cycles, which the situation is similar to dog always keep moving beyond the boundary.
IX.Reset Operation
1.Reset Transmitter
if the battery is full capacity, but the transmitter can’t power on, please press the RESET button to restart it. Then it will be powered on.
2.Reset Receiver
when the battery is full capacity, but the receiver collar can’t power on, please charge the receiver collar again for one or two seconds to make it RESET. Then it will be powered on.
IMPORTANT Notice :
When the transmitter indoor usage please help increase the transmitter signal levels accordingly because of the obstruct of the house structure.
| Item | Transmitter | Collar Receiver | Signal Range |
| KD661 | without built-in batterypowered by standard 110V-240V Power Adapter | rechargeable & waterproof tone & shock stimulus | radius maximum up to 500 meters |
| KD661C | with built-in battery powered by standard 110V-240V Power Adapter or built-in battery( portable oroutdoor usage) | rechargeable & waterproof tone & shock stimulus | radius maximum up to 500 meters |
X.Important Notes
- The wireless fence system is intended to use for dogs only.
- A low battery may cause intermittent operation. Do not use it and charge it immediately for a low battery.
- DO NOT leave the collar on your dog for more than 10 hours per day.
- Keep the receiver collar away from children.
- Read all instructions before using this product.
Buy KD-661 Wireless Dog Fence Replacement Collar From Amazon.


18 Responses
I just bought this, and the antenna broke immediately. I think I can make it work, please advise if I should return. I did not put much pressure on it or break it myself. Not even sure how it broke, really. Also, what are the 20 flags for? It does not show anything about how to use them.
Hello Brad,
Would you like to show the antenna picture? Our technical team maybe can fix it. Thanks
Hello,
I can’t get it to work I followed all instructions and there’s no shock or beep when my dog leaves the perimeter set. Please help.
Hello Kari,
was the wireless dog fence receiver power on ?
Please, keep to the point.
what is your return policy?
As the amazon.
You won’t believe this but my puppy ate the user guide. Can you send me another one… Please. I have been trying to follow these instructions but I need pictures because I can not get passed setting the parameters and charging. My transmitter nor receiver never turned blue and I can not operate the receiver without plugging it into a power source.
Hello Donald,
have you fixed it?
mine has to be plugged in too. not working either
Thanks again!
My receivers want to beep constantly I have reset a couple of times never the less I don’t know what else to do. We live in a steel frame brick home. Is this maybe the problem?
This doesnt seem to be working. tried it my lab ran in road! it beeped but didnt phase him? how does the vibration work
Just got this set up. How do I set the intensity of the shock
Thank you
Cindy
Collars will not charge. Nor will they turn on. Had system a week. 3 collars. Used up the 3 original charges and never got collars to charge again. They will not reset and come on. Charge them all overnight. Nothing. Seller not helping. Will not respond to my request for help.
Request a replacement collar from the seller.
What is the clear blue plastic part for?
Test Light