Table of Contents
INTRODUCTION
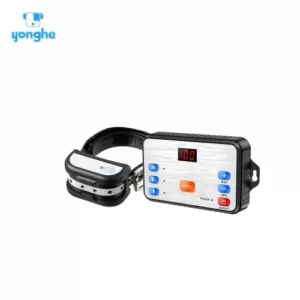
The product is a revolutionary 2-in-l wireless fence and training collar system that is specially designed to help pets learn to stay within the boundary. Our goal is to give pets the freedom to roam while keeping them safe inside the boundary. We believe that knowing your pets are safe will bring a more peaceful and better balance life for pet owners.
Before getting started, please take a moment to read through the important safety information. If you have any questions, please dont hesitate to contact our customer support team.
IMPORTANT SAFETY INFORMATION
Explanation of attention words and symbols used in this guide.
 This is the safety alert symbol. It is used to alert you to potential personal injury hazards. Obey all safety messages that follow this symbol to avoid possible injury or death.
![]() AWARNING indicates a hazardous situation which. if not avoided, could result in death or serious injury.
AWARNING indicates a hazardous situation which. if not avoided, could result in death or serious injury.
![]() CAUTION , used with the safety alert symbol, indicates a hazardous situation which, if not avoided, could result in minor or moderate Injury.
CAUTION , used with the safety alert symbol, indicates a hazardous situation which, if not avoided, could result in minor or moderate Injury.
![]() CAUTION, used without the safety alert symbol, indicates a hazard ous situation which, if not avoided, could result in harm to your pet.
CAUTION, used without the safety alert symbol, indicates a hazard ous situation which, if not avoided, could result in harm to your pet.

- Not for use with aggressive pets. Do not use this product if your pet is prone to aggressive behavior. Aggressive pets can cause severe injury or death to their owners and others. If you are not sure that this product is right for your pet, please kindly talk to your veterinarian or a certified trainer.

- Wireless fence system is NOT a solid barrier. The system is designed to act as a deterrent to remind pets by beep, Vibrate or shock correction to remain in the boundary established. It is important that you reinforce training with your pet on a regular basis. Since the tolerance level to shock correction varies from pet to pet, WE CANNOT guarantee that the system will in all cases, keep a pet within the established boundary. Not all pets can be trained to avoid crossing the boundary! Therefore, if you have reason to believe that your pet may pose a danger to others or harm himself if he is not kept from crossing the boundaries, you should NOT rely solely upon the wireless fence system to confine your pet. We shall NOT be liable for any property damage, economic loss or any consequential damages, sustained as a result of any animal crossing the boundary.
- This product is not a toy, Keep it out of the reach of children.

- Proper fit of the collar is important. A collar worn for too long or made too tight on the pets neck may cause skin damage ranging from redness to pressure ulcers; this condition is commonly known as bed sores.
- Avoid leaving the collar on your pet for more than 12 hours per day.
- When possible reposition the collar on the pets neck every to 2 hours.
- Check the fit to prevent excessive pressure; follow the instructions in this product manual .
- You may need to trim the hair in the area of the contact points. However, never shave your pet’s neck: this may lead to a rash or infection.
- Never connect a leash to a collar with contact points. It will cause excessive pressure on the contact points.
- When connecting a leash to a separate collar, do not allow it to put pressure on the receiver collar.
- Wash your pets neck area and the contact points of the receiver collar weekly with a damp cloth.
- Proper training of your pet is essential to successfully using the system.
- During the first 2 weeks of training, do not use the system without direct supervision of your pet.
- Always remove your pets receiver collar before performing any transmitter testing or adjust ments. This will prevent unintended corrections.
- The boundary zone must be tested whenever an adjustment is made to the fence transmitter setting to prevent unintended corrections to your pet.
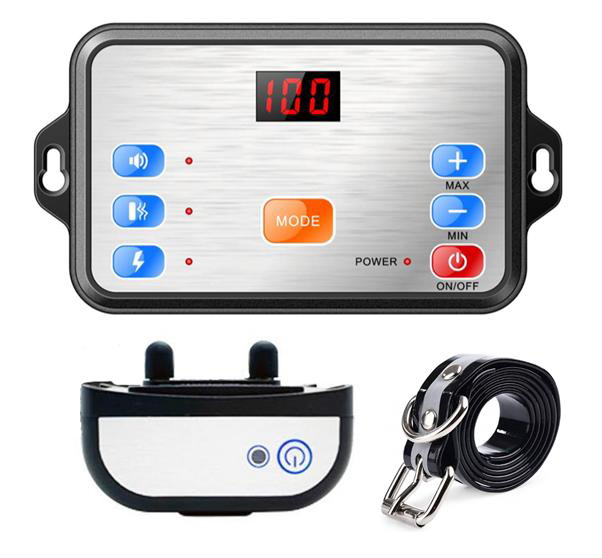
COMPONENT

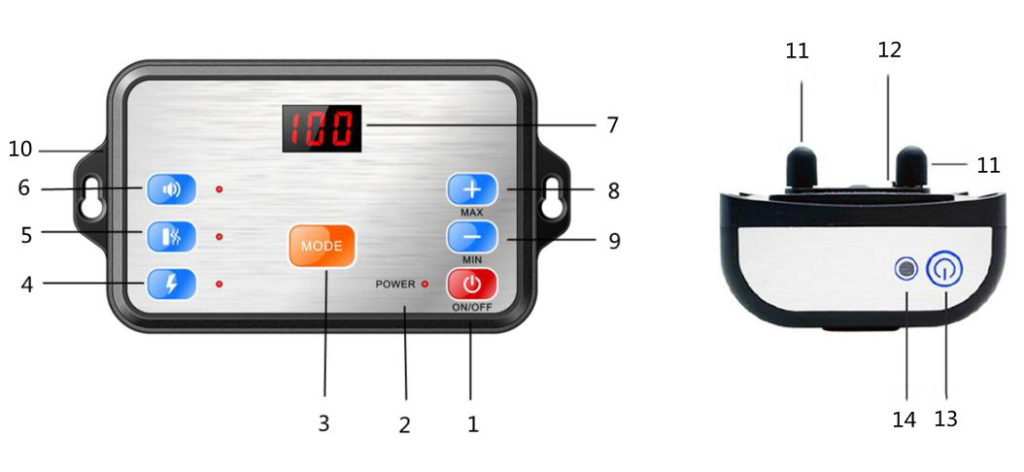
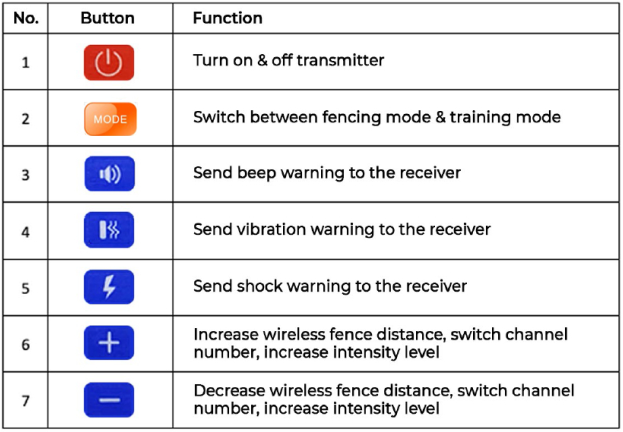
1.Power button
2.LED indicator
3.Switch mode button
4.Vibrate mode
5.Shock mode
6.Beep mode
7.LED screen
8.Increase button
9.Decrease button
10.Charger port
11.Contact point
12.Charger port
13.Power button
14.LED indicator
The screen on the transmitter will show several different numbers to let you know the status of the unit and which mode that currently you are in. Please take the time to learn the definition of different number shown on screen, it will help you to operate the system better.
Screen Display
Fencing mode
 1~100 level:
10~300 meters distance can be adjusted, set according to the place of use
when using.
Training mode
![]() Signal channel number is selected.
Signal channel number is selected.
![]() Signal channel number 2 is selected.
Signal channel number 2 is selected.
![]() Signal channel number 3 is selected.
Signal channel number 3 is selected.
![]() Intensity level l of the pressed warning correction.
Intensity level l of the pressed warning correction.
![]() Intensity level 2 of the pressed warning correction.
Intensity level 2 of the pressed warning correction.
![]() Intensity level 3 of the pressed warning correction.
Intensity level 3 of the pressed warning correction.
 Low battery. Flashing 000 on screen indicates the unit is low in battery. Please charge
the unit immediately.
HOW THE SYSTEM WORKS
The product comes with 2 different modes, fencing mode and the training mode To switch between modes, simply press the mode button on the transmitter.
In fencing mode, the system works by transmitting signal in all direction, form ing an al most circular shape with the transmitter as the center point. The receiver will receive the signal when it is inside the set boundary and will stop receiving the signal when it has gone outside the boundary or when the transmitter runs out of power due to the battery being drained or turned off.
When the receiver collar receives the signal, it will know that the pet is within the set boundary and no correction will be triggered When the receiver collar stops receiving the signal, it will know that the pet has gone outside the set boundary and a correction warning will be given to the pet.
The collar works as follows in fencing mode
Stage 1-collar will beep for 5 seconds.
Stage 2-Collar will vibrate for 5 seconds.
Stage 3-collar will beep vibrate together for 6 seconds.
Stage 4 -Collar will send a shock for 5 seconds.
Stage 5-collar will beep& shock together for 6 seconds.
Stage 6-collar will only beep until the pet returns to the boundary area .
In training mode, the transmitter will act as remote control which can be used to manually send a correction warning to the receiver collar. If you have multiple collars, you can also select which collar you want to send a correction to. This will allow you to send different corrections independently between collars. There are 3 different corrections available, beep, vibration and shock.
NOTE
- The receiver collar will send a correction (beep, vibrate, shock)when it is unable to receive a signal transmitted by the base unit. This includes when the pet leaves the boundary, when the signal is interfered with and when the transmitter turned off or runs out of battery power.
- When not in use, turn off the receiver collar first to prevent it from sending false corrections.
- The wireless fence relies heavily on the signal transmitted by the transmitter. Any obstacles like walls, trees, a truck or radio waves might provide signal interference that will affect the distance of the fence.
OPERATION GUIDE
Initiap Setup
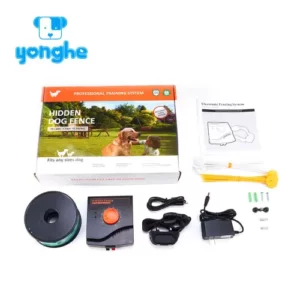
- Open the package, take out the transmitter, receiver, metal probes, LED tester, silicone covers, and the charger.
- Pick one pair of metal probes suitable for your pets (shorter probes for pets with shorter hair, longer probes for pets with longer hair)and attach it to the electrode point of the receiver.
- To minimalize the stimulation of shock mode, cover the metal probe using the silicone covers provided.
- Before getting started, please charge both transmitter and receiver.
Setting Up Fencing Mode
In fencing mode, the receiver can work automatically without having to pair with the device. Once the receiver is turned on, it will automatically search for signals transmitted by the trans- mitter.
- Plan your layout and estimate the distance between the transmitter and boundary so that you can put the unit in the best possible spot.
- Place the transmitter in a wide-open space with minimal obstacle so it can transmit the signal properly.
- Set the boundary on the transmitter Distance can be adjusted from 1 level to 100 level ,10~300 meters, set according to the place of use when using.
- With LED tester placed on the metal probes of the receiver, walk towards the boundary and check if the distance covered is sufficient.
- If the distance is not sufficient, go back to the transmitter and readjust the distance. You can also simply adjust the position of the transmitter to solve a short gap distance.
- After checking the distance, attach the receiver to the collar strap and put the collar on the side of the pet’s neck with the contact points touching its skin so it can receive the signal better.
- Leash your pet and introduce them to the new established pet area.
- Once trained, your pet can roam freely in the pet area.
Setting Up Training Mode
Unlike fencing mode, in training mode you will need to pair the collar to one of three channels available in the base unit. Once you have successfully paired the collar, you will be able to manually control each channel independently.
When switched to training mode, the fencing feature will be disabled, and you will have up to 300m remote control distance.
Sending a correction to the collar receiver is simple
- Press the mode button to switch from fencing mode to training mode.
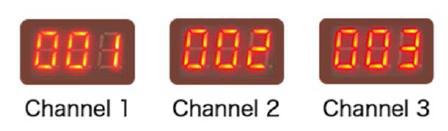 The LED screen will show 001 002 or 003, which indicates the channel number.
 - Select one of the channels that has been paired with the collar by pressing the(+ )or(-) button.
- Press the correction button to send a correction to the receiver collar.
- If the correction is not strong enough for your pet, you can adjust the intensity level by pressing the correction button, and pressing(+)or(-) to adjust the intensity level. Each correction comes with different level of intensity that can be adjusted accordingly. Level 1 is the lowest and level 3 is the highest Beep warning has only 1 level of intensity, while vibra tion and shock have 3 levels of intensity.
Pairing the Device
- Turn on the collar and base unit.
- Press the mode button to enter training mode. Select one of the channels to pair with the receiver by pressing (+ or-] button.
- After selection the channel, long press the mode button until the LED screen flashes. At this point, the channel is ready to be paired.
- Take the receiver collar that you want to pair with this channel, long press the power button on the top for about 3 seconds until it is paired successfully to the transmitter.
- When the pairing process is successful, the unit will beep, and the LED screen will stop flashing.To pair another receiver, press the mode button and select another channel. Repeat the steps above with a different channel and receiver collar.
NOTE
- When the LED screen flashes, the transmitter is waiting to be paired, thus it stops transmit ting a signal and the receiver will start to beep as it stops receiving signal.
- A transmitter can only be paired with maximum of 3 collars. One collar for each channel.
- If the receiver is not in use for 5 minutes, it will hibernate and enter standby status. A gentle shakes or movement can re-activate the collar instantly .
Charge the Device
When the transmitter is in a low battery, the LED screen on the transmitter will flash and show 000. Please recharge device immediately.
Both transmitter and receiver come with a built-in rechargeable battery which make this unit very portable and easy to carry with during vacation or camping. It takes around 4-5 hours for the transmitter and around 2-3 hours for the receiver to be fully charged.
With the charger provided inside the box, you can charge two devices simultaneously. To charge the devices.
- Take the transmitter unit, lift the silicone id of the charging port, which is located on the side of the device, and plug the charging cable into the charging port.
- Take the receiver collar, lift the silicone lid located under the metal probes, and plug the other connector of the charging cable into the charging port.
- Plug the charger into the wall or power supply.
NOTE
- To avoid having the transmitter run out of battery while in use, you can also keep the unit plugged in whenever there is a power supply available.
- Please do not remove the screw at the back of the receiver. This screw holds a silicone lid and also a small piece of metal inside that holds the charging head in place to charge the device properly. If the screw is removed, the device will not charge normally.
- When charging, a red LED light will flash. When fully charged, LED light on transmitter will turn to solid red and the LED on the receiver will turn solid green.